Wood Fired Ceramic Kiln – Kiln Design
When designing a wood fired ceramic kiln the main factors are temperature and atmosphere. From a temperature standpoint the kiln has to both reach adequate temperature and at the same time withstand the temperature. In order to reach the adequate temperatures three major consideration need to be made, first air flow, then firebox to chamber volume ratio, and lastly insulation. In order to withstand the wood fired environment the correct materials need to be selected given the highly alkaline nature of the wood fire atmosphere. For example, traditional insulating firebrick is attacked rather severely by a wood fire over time.
Fire needs oxygen to burn and therefore the firebox needs a primary air inlet port. However, the air that enters the firebox must also travel through the kiln and out the chimney. The relative sizes of these air passage ways partly dictates the air velocities. Because the gases expand significantly as they are heated the passage way from the firebox into the chamber must be larger. The primary air inlet port has an opening of 13.5 sq.in. while the passage way from the firebox to the chamber is six times larger. However, there are also mouse holes that allow a small amount of air to enter the firebox at the bottom to allow the smaller embers to continue burning. The area of these is 9 sq.in. but during practical operation they become fairly full of embers and the operating area is a fraction of the designed area, more like 3 sq.in. After the gasses have entered the chamber they give off some heat and cool down somewhat, especially when the chamber temperatures have not yet reached high temperatures. In order to facilitate performance at all temperature ranges, the outlet port for gases to enter the chimney has a variable area by way of a damper. The maximum area of the outlet port is 81 sq.in., the same as that of the firebox to chamber port.
Practically speaking many kiln designs do not include a separation of the firebox and the chamber. One popular example is the Anagama kiln. In these kilns, the wood is inserted right in front of the pottery and while there is usually a partial wall, called a bag wall, there is the risk of charging wood right onto the pottery. Another characteristic of this type of kiln is the short stoking cycles. These kilns are stoked on the order of every 10 minutes, which is not exactly relaxing. Another, much less explored design type is the Bourry Box. This design type is named after a Frenchman, Emile Bourry, who describes the design in his 1911 work titled A Treatise on Ceramic Industries. The most interesting aspect of the Bourry Box is that the fire burns upside down. Air enters from the top of the firebox and onto the wood. The flame is carried downward towards an opening at the bottom of the firebox. From there it enters the chamber, rises, and then is drawn back down again into the chimney inlet port. Below is a cross-section of the kiln that was designed for this project showing the air flow.

Secondary air is drawn from the bottom through “mouse holes” to aid in the more complete burn of the embers that fall through the hobs, or the bars upon which the wood rests. Not shown in the image is the complex stack of kiln shelves and posts setup to disperse the flame throughout the pottery inside the kiln. The total internal volume of the chamber is 16.24 cu.ft. This allows for between 75 and 100 pieces of pottery to be stacked in nine different 12″ x 24″ areas. The firebox volume is 3.6 cu.ft. This gives a volumetric ratio of 4.51. A ratio less than 6.8 is considered overpowered which aids in the ability to reach temperature without maximizing the packing of wood inside the firebox.
As the temperature begins to rise, the chimney heats up and increases the draw of air through the system somewhat like a siphon. The design height of the chimney was 12′ but this wasn’t practical with the first instantiation as documented in the Kiln Construction page.
The stoke port was designed in duplicate; one on either side of the firebox. These ports were 13.5″ x 12″ and were covered by a single piece of castable refractory. Because the firebox width is 36″ it was expected that charging from both sides would be necessary but based on the firewood that was on hand it was determined that the duplicate stoke ports weren’t necessary. However, it may be needed in the future. For the first firing one side was bricked up and the second door was not used.

Exploded view of the firebox
Not only does the kiln need a place to charge wood into the firebox but it also must have a clean out to remove the coals from the firebox as they build up over time. The only important aspect is that a clean out shovel must fit through the opening and the materials must not allow too much heat to escape during operation. The convenience is not a high factor since the clean out port must only be used a handful of times during a single firing. In this kiln, the design makes use of a 9″ x 9″ opening in the bottom center of the firebox, just above the mouse holes. The cover was designed as a single piece castable refractory block. During the first firing a different solution was immediately put into use.
Exploded view of the clean out port
During the firing two methods of monitoring are made use of, the first is a thermocouple and the second is a pyrometric cone. Oftentimes when a specific cone is desired to be reached the series of cones immediately surrounding it will also be used. For example, if cone 10 is desired, cones 9, 10, 11, and 12 can be used to determine exactly how far to completion the kiln has progressed. The twist is that the cones must be visible from outside the kiln. This necessitates peep holes in the kiln side. Two peep holes were used, one near the front of the chamber and one near the back. The thermocouple can be inserted into either peep hole during operation to gauge progress along with viewing the cones. The original design was a 1″ diameter hole in a cast block formed by casting refractory around a 3″ diameter kiln post.
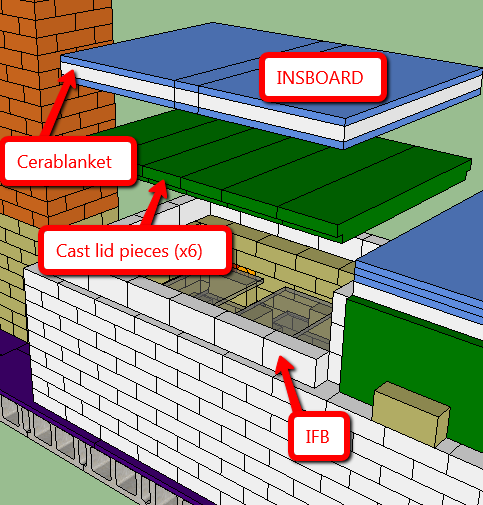
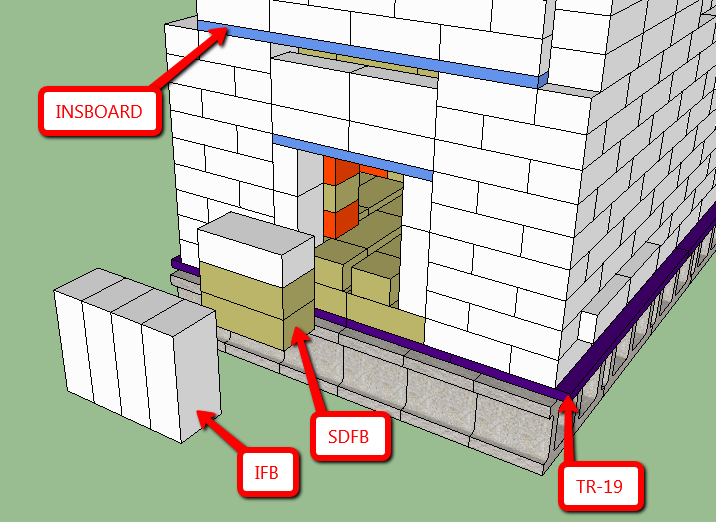
Exploded view of the chamber
Inside the chamber the ceramic pieces must be arranged such that they do not touch one another. From an efficiency standpoint it is necessary to arrange shelves and posts inside such that many more pieces can fit. Firebricks are used as posts and oxide bonded Silicon Carbide is used in the 12″ x 24″ shelves. Six shelves fit yielding nine locations to stack the pottery. In order to prevent the wood ash or glaze components from contacting the shelves and becoming permanently adhered thereto, the shelves are painted with a liquid called kiln wash. Kiln wash is commercially available but mixing it from raw ingredients was more successful since it is desirable in a wood kiln to have some different characteristics. The components of the kiln wash are Alumina Hydrate (50%), Calcined EPK Kaolin (25%), EPK Kaolin (25%) and an additional 1-2% of G-200 Feldspar.

Shelf with wash applied
By adding the calcined Kaolin, the product doesn’t crack off of the shelf while the feldspar is added to help adhere the layer of wash to the shelf. Without these two components the wash can crack, flake off, and adhere to a nearby coffee mug essentially destroying it. This is especially a problem in a turbulent environment such as wood fired kiln. To the dry ingredients, enough water was added to make the consistency of pancake batter. The wash was thick enough that only one coat was needed. However, a thinner consistency would have been better since the wash dried in an alligator skin pattern in some spots. More coats may have been necessary but the shelves would be better protected.

February 12, 2021 at 10:52 am |
If I wanted to build a MICRO kiln for firing very small pieces a few at a time, does it all need to be brick? Can I build a chimney out of pipe?
February 13, 2021 at 9:10 am |
Yes, maybe. It depends on your material selection. Do not use galvanized steel as it releases toxic gases at these temperatures. Using non-galvanized steel or iron is possible but it won’t last long due to rapid oxidation at high temperatures. If you don’t need to fire it more than a few times then it may be an option so long as you ensure temperature vs material softened point, ie make sure it doesn’t begin melting in a spot, become weak, and fail unsafely . My new kiln uses fire brick for the first half of the chimney and then house brick (cheaper) for the top.