Wood Fired Ceramic Kiln – Adventures in High Temperature
This documentation is a work in progress. Enjoy but understand that it isn’t yet complete.
Feel free to contact me for any questions or details at adam(at)drstienecker.com
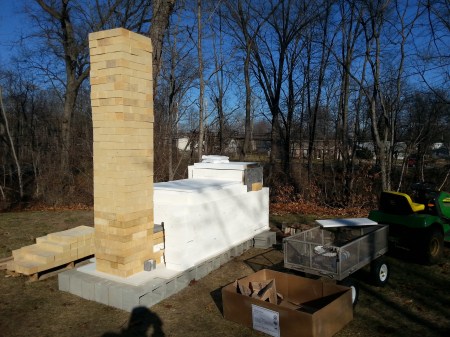
- The Finished Kiln Ready for Fire
The pyrometric cone… a new unit of measure for me upon entry into the world of pottery. This unit of measure quantifies an amount of heat over time or the amount of work that the heat accomplishes on the ceramic piece. More precisely it is a time and temperature to cause a specially designed cone shaped material to bend under its own weight. For example a cone 10 firing is a temperature over a time specified by one manufacturer of large self-supporting cones as 2345F at a ramp rate of 108F/hr or 2381F at a ramp rate of 270F/hr. Cone 12 (2419F) is typically the highest cone rating used in pottery, although cone 13 and 14 aren’t unheard of. This means of measurement was developed long ago prior to any modern measurement techniques and continues to be a practice in pottery because it represents the true work being done on the clay and glaze inside the kiln, something temperature measurement alone cannot accomplish.
Fourteen years ago, on August 11th, 2000, I married into pottery. My wife is a potter and has made many beautiful pieces of pottery over the years with the use of modern day electric and gas fired kilns. With the exception of building or putting together a space for her to work and selecting the color for my next new coffee mug I haven’t had much involvement with her “sport”. That is, until recently when she made mention of a more traditional means of firing ceramics with wood. As an engineer that enjoys a new challenge and someone who gets strangely excited about manual labor, I figured the combination of designing and building a ceramic kiln along with cutting and splitting large amounts of firewood was in my bailiwick. While my academic training was not in ceramic engineering I was determined enough to study up on the subject from an application standpoint in order to accomplish my goals. Since my back doesn’t allow me to chop firewood during the entire weekend or even during the entire weekday evening, I had time to study up while unable to move after having overdone it!
The interest in a wood fired kiln is the visual effects that can be seen on the pottery that has gone through the fire in a deeply reducing (oxygen starved) atmosphere. The ash deposits onto the ceramic ware and melts, acting as a flux to pull out other components of glaze from the clay body beneath. A bare ceramic piece will therefore become glazed automatically through the firing. The flame path through the kiln can also paint patterns on the ware. In a electric or gas fired kiln the artistic results are defined before the kiln is turned on, with a wood fired kiln, there is significant uncertainty and dependency on the firing itself.
I have attempted to chronicle much of my learning and experience herein in the following areas.
Click here for Kiln Design – With Trimble Sketchup I was able to build several different varieties taking into account heat transfer, material availability, size, cost, firewood usage, and performance. I document the final variation that was built herein.
Click here for Materials – At temperatures as high as 2400F there are special materials that must be considered such that the kiln will have a favorable life of on the order of 10-15 years. However, the usage of these materials must be balanced with cost to be economic since I’m not independently wealthy!
Click here for Kiln Construction – While the building phase is the culmination of a significant amount of research, design, and analysis, not all practical aspects line up with the theory or specifications. This presents opportunities for small redesigns in the field and forces acceptance of some non-idealities. Only with the upfront research was it possible to understand what non-idealities were acceptable and which were not!
Click here for Firewood Basics – Not all wood species and shapes and sizes are the same nor do they split equally well.
Click here for Our First Firing – On New Year’s Eve 2014, at 11:30am, we lit the first fire which concluded 17.5 hours later at 6:00am the following day when we stopped stoking and closed it up.
Click here for Safety – From proper material handling to radiant heat protection during firing, this topic cannot be ignored!

August 3, 2015 at 8:13 am |
Dear Dr Stienecker – Firstly, I am very impressed with your innovative kiln design and build – I am a trainee ceramicist in the UK planning my first kiln build. Your design struck me as a very elegant and simple solution which would be easier to achieve than the sprung or catenary arch designs I have come across. I hope you don’t mind my asking a question. My main concern is the strength of the castable refractory plates over the firing chamber at peak temp (in my case I am firing mainly to 1100C but will occasionally take it to 1280C). Judging by your photos, your ceiling plates span a width of 805mm. In my design (downdraft gas kiln) they would have to span a width of 1150mm. What thickness would I need to cast the plates to to ensure that they won’t break? With many thanks in advance. Marek.
August 3, 2015 at 11:58 am |
Marek, Thanks for the compliments! The open span of the chamber is 3 bricks at 9″ (~229mm) each for a total unsupported span of 27″ (~686mm). The length of each top piece is 36″(~914mm). The strength will be based on many things but you must start with the manufacturer’s specifications of the castable refractory in order to calculate the strength. I used Mizzou Castable Plus for its availability and strength. You may have a different availability but look for high modulus of rupture values. I did not work through the math on your span of 1150mm but that’s a long way! I designed the thickness of the top (3″) based on the specifications, safety factor, and the fact that my bricks were also 3″ thick. I then used refractory needles to add additional strength as an insurance policy. We have fired only three times so far but have observed no cracks. However, since we are firing to (1300C+) over 24+ hours we have observed some sagging of the pieces. Our strategy for the next firing is to fire them upside down and alternate in subsequent firings. One very important feature to the top is the cast-in handles on each end. The pieces are 60lbs (27kg) or more so it takes two to load and unload the kiln. Unfortunately because of the handle design they will become unusable when I turn them upside down. While designing the kiln I looked into another method that you may want to consider given your span is much greater than my 27″. The concept is to cast-in metal pieces much like you would embed concrete anchors into wet concrete. You’ll have to give these metal pieces significant “bite” so they resist pull-out. Once the castable is air-cured then the pieces can be fastened to a metal support structure. With this method you can use angle-iron or an I-beam that both lays on top of the castable but also fastens to the castable so as to support the weight of the castable. One of the drawbacks to this is that it’ll be more difficult to insulate your lid which you’ll need to do since the thermal conductivity of castable produces little gradient through the thickness. Pay careful attention to the type of metal you use. Many metals will not work at these temperatures! Another consideration you could investigate is an internal support structure wall if the chamber height permits it. For example a checker pattern of bricks stacked up under the lid can reduce your lid span by half. Additionally, consider your dimensions and maybe you can sacrifice width for additional length or height (I know the ratios are supposed to be 1/1/1 but they don’t have to be!). Physically speaking, the flat roof in my kiln was easier to achieve during the build but from a design standpoint you need to spend much more time than in the arch designs you refer to. Also, the success no longer depends on your strength and endurance in the build but depends on your design and material science abilities before you even purchase your materials. Let me know what you decide to do!
August 4, 2015 at 7:28 am |
Adam, Thanks very much for your very helpful and detailed reply. 🙂 In my case, a redesign of my kiln chamber would be very difficult for a few reasons. The footprint of the site is limited and limits the size of the kiln to about the minimum I am happy with. Also the type of kiln I’d like to build (downdraft) necessitates bag walls that run lengthwise from door to chimney which makes the usable chamber narrower than tall for a 1:1:1 total chamber ratio – unfortunately I think this would make an internal roof support wall impractical. I think given the dual problems of potential sagging and my limited knowledge of material science, I will go for one of the commoner solutions ie. to build an arch based on one of the plans available in books. I’m just at the design stage and it will realistically be a year or so before I start the build but I’ll certainly let you know and may even take a leaf out of your book and set up a blog! Many thanks again and good luck with your kiln. I came across these in my research – perhaps this would be of help if the roof sags were to become a problem. I chose not to use them as I thing the challenge of selecting the right materials and design to safely support the blocks would be beyond my knowledge and the likely expense.
Click to access insulatingroofblocksbv.pdf
August 4, 2015 at 7:41 pm |
Interesting roof blocks. I suspect they are outside of my budget as well! Let me know if you change your mind on roof style and need a sounding board. Good luck and happy designing!